Here we go with a tutorial about some time-saving tricks for making turned and topstitched pads. This is a method I was first introduced to by watching the YouTube videos made by Courtney of Versodile. Go look them up! They're terribly helpful.
Please don't let all of the photos and details in this post overwhelm you! When I'm learning something new, I want all of the details and information, and then I choose which parts I want to use and keep. I decided to include as many bits as I could. I figure, that way if someone is a beginning beginner at pad making, there will be information for them here, and there will also be help for those who have been making pads for a bit and want to just take their work up a notch.
This post feels like it took forever to put together! The problem was that this was my first time ever trying to sew with suedecloth, and I did not anticipate how squirrely it would be to sew. I thought it would be like sewing with cotton, and it was absolutely not. So I'm including in these photos and instructions a bit about working with suedecloth in particular, and what I did to manage it. I'm going to mark the parts that were specific to this type of fabric with an asterisk (*), so that if you're working with something easier, like cotton, you can just disregard those parts.
Okay, let's get this party started!

For this tutorial, I chose to use a pattern called, "Love My Lady Cloth" by I Heart To Sew. I'll do a review on the pattern itself in a future post, but I chose this pattern for today's pad because as you can see in the picture above, it comes with two lines - a cutting line and a sewing line. The trick to this speedier method of pad making is that we just aren't going to cut on the cutting line. The majority of the cutting will happen in one swoop at the end of the project.
So the first thing you'll do is print out your pattern, and cut it out on the sewing line, instead of on the cut line. (In this pattern, the dashed line is the sewing line, and that's where I want to cut out the pattern piece - the part where I'm pointing in the photo.) If your favorite pattern doesn't have a sewing line printed on it, you can just determine what size the seam allowance is on your pad (does it have a 1/4", 1/2", or 3/8" seam allowance?). Then, use a ruler and a pencil and trace that far to the inside of your cutting line, and cut there.

Here are my pattern pieces, all cut out.

At this point, you'll use your core pattern to trace the core onto a single piece of your core material, and then use the speed core method I described a few posts ago. For my pad, I'm using a Zorb sandwich of 1 layer of diaper flannel, one layer of Zorb 1, and another layer of diaper flannel. Finish up making your core, and set it to the side.

Next you'll place your main pattern piece on the back side (also called the wrong side) of your topper fabric. It's important to remember that you need to leave enough fabric at the sides to account for some seam allowance. I try to make sure the pattern piece is about 1/2" from all edges of the fabric, so that I can be sure I have plenty of room to sew when I'm ready for that step.
Then, you'll trace your pattern piece onto that back side of the topper fabric. I've tried lots of fancy and expensive tools for this, but my favorite is just a washable crayola marker.

Using your rotary cutter, rough cut around the outside of the line, being sure to leave plenty of fabric for a seam allowance. Here, I've just cut a rectangle of fabric around my pattern shape, but you can cut it more conformed to the shape if you want.
*As you can see in the photo above, the ink in my marker bled out into the fabric. In all the fabrics I've worked with, this was unique to suedecloth. I was worried at first that my markings wouldn't be clear enough, but you can see that there is still a distinct line on the fabric, so it turned out fine.

(Generous pregnant belly shot. You're welcome. Seriously, this is what I'm trying to work around here!)
Now you'll lay your topper fabric over your backer fabric, and with your rotary cutter, cut the backer fabric to the same size as your topper. I'm using Windpro fleece, but if you're doing a hidden PUL backer, you'll do this for the PUL and for the fabric you're using as the layer that will touch your underwear.
*This is where things really started getting crazy with the suedecloth. I couldn't believe how shifty it was! If I bumped or tugged on it in any way, even though the fabric remained flat on the work surface, the entire shape would change. I accommodated for this by making sure that any time I had to move the fabric, I would lay the pattern piece back on the top of the fabric and adjust the suedecloth, as shown in the above picture, to make sure that the lines I'd marked on it matched up correctly to the actual pattern piece. That way I wouldn't end up with a lopsided pad in the end. If you're not using a shifty fabric, this isn't a necessary step.

At this point, you'll need to secure your core to the back/wrong side of your topper fabric - the side where you've drawn your pattern. To really give the pad a nice finish, make sure you measure in from the sides of the sewing line to the side of the core, and ensure that it's even. Use as many pins as you need to feel good about the core not shifting as you sew.
*This topper fabric would shift something fierce when I tried to pin the core to it, so I opted to use basting spray to secure the core to the topper. If you've never used basting spray before, it's a handy weapon to have in your arsenal. Just lightly spray the core and rest it onto the backer. It holds the pieces securely, as you can see in the photos, it's repositionable (like a post-it note), and it washes away in the first wash.

Now moving to the sewing machine, and placing the topper fabric facing down and core material facing up, you'll sew the core onto the topper. (I always use my walking foot when making a pad, but it's okay if you don't have on yet. Just go slowly, and work with your machine!) I like to start with a channel down the center of the core, beginning and ending about an inch from the ends of the core material. This isn't a necessary step, just something I like to do. When stitching around the outside of the core, make sure that your stitching comes nice and close to the edge of the core material. Use any stitch you'd like - keep in mind all of these stitches will show on the finished pad. Make sure you're sinking your needle in the fabric, then lifting and lowering the presser foot every few stitches when you're navigating the curves, or your pad will be a mess, because your topper fabric will want to shift and bunch up underneath your core as you go. Take as much time as you need with your sewing - don't feel pressured into a race!

Once your core is secure on the topper, it's time to make your pad sandwich. When you do this, you want to make sure that all of the parts that belong on the outside of the pad, are facing the inside of the sandwich.
It will look like this if you're using a fleece backer:
-backer fabric, with the wrong side touching the work surface (the fuzziest side - the right side - will face up)
-topper fabric, right side touching the backer fabric (the wrong side, with the core on it will face up)
-core
It will look like this if you're doing a hidden PUL layer:
-PUL, shiny side down, touching your work surface.
-backer fabric (the one that will touch your underwear and show on the outside of the pad), wrong side down, touching the PUL. (The pretty side will face up.)
-topper fabric, right side down (The pretty side of the topper fabric will kiss the pretty side of the backer fabric)
-core
(If you look at my past post with a review of the "Flares" pattern, I had my backer fabric facing the wrong direction during the sandwiching process, so once the pad was finished, the back looked inside out. It happens!)

Once you have your sandwich made, it's time to pin or clip the pieces together. Situate your pins or clips around the outside of the sewing line you've made on the topper. It's a good idea at this point to flip your sandwich over and smooth everything out to make sure there aren't any bubbles or bunched up spots.
*In the above photo, you can see that I've cut away more of the excess fabric. This is because I discovered that the suedecloth wanted to shift around unless it was secured closer to my stitching line, but pins weren't a good option for the most part, because they wanted to push the slippery fabric around and distort the shape. If you're not using a slippery or shifty fabric, this won't be that necessary, since you'll probably be using pins near your sewing line anyway.

Pin or clip all the way around.
*In this photo, I'm just showing that once again, I needed to place my pattern piece over my work to make sure that the suedecloth hadn't shifted, and my pad shape hadn't distorted.

I like to make a few marks on the sewing line (the little green marks here), at the straightest part of the line, to remind me where to start and stop sewing. This tells me where to leave my opening for turning. Because I've forgotten to stop a few times. Uh... like on this pad later on. Oops.

Now comes the sewing! This is the beautiful part! Because you traced a sewing line and not a cutting line, it's so darn easy to just stitch along the line instead of trying to navigate a seam allowance with bulk on one side of your presser foot and thin layers on the right.
Position your pad under the presser foot so that the line on your fabric falls directly under your needle. Begin where you've marked for the turning opening and backstitch, then stitch forward a few times to make sure that stitching won't come undone when you turn it right side out. (This is the only time I backstitch with my walking foot, because a walking foot isn't built for backstitching.)
And now you'll just stitch around the pad, making sure your needle is always stitching directly on the sewing line.

When you get to the curves, it's really important to make sure you're navigating the curve without pulling and pushing on your pad. As you can see in the picture above, on the left, the sewing line has started to take a jog to the left, instead of traveling straight ahead of the presser foot. This is when it's time to sink your needle into the fabric, raise the presser foot (top right picture), turn your pad slightly so that the line points straight ahead of your presser foot again (bottom right picture), lower your presser foot, and take a few more stitches. Repeat this process every time that line takes a jog to the left instead of pointing straight ahead.

When you get to the wings (or any other corner), stop sewing right at the corner, sink the needle into the corner, lift your presser foot, turn the pad so that the line is ahead of the presser foot again, lower the presser foot, and then continue to sew. Repeat this at every corner, no matter which direction the corner turns.

When maneuvering around the curves, I like to hold onto my pad way off to the side, as pictured above, instead of having my hand by the presser foot. That helps me remember not to push and tug on the pad to get around those curves, but just to guide it and use the presser foot and needle for a cleaner line of stitching.

Once you've come back to your markings for your turning opening, backstitch and then stitch forward a few times to secure the stitching at the opening. You want the opening to be a few inches long. (This is where I went a little too far, and my opening was only about an inch and a half long. It was like giving birth trying to turn this sucker right side out.)

Now that you're done sewing the pad together, it's super important to remember all of your clipping. This is the other super time-saving part of this technique. In the past, when I was cutting my pads out on the pattern line and following a seam allowance, it left a lot of bulk in the seams that I had to clip a lot of notches out of at the curves, and the finished seams were still bulky after topstitching. This saves you the time of clipping all of those notches, and creates a trimmer pad.
Using your sharp sewing scissors, clip away the excess fabric around the outside of the stitching. Only leave 1/8" of fabric outside the stitching line. Make a snip at every inside corner (like where the wing meets the body of the pad), and clip off all of the outside corners (like the corner of the wing tab). Get right up next to the stitching on the corners, but make sure you don't cut your stitches. Leave about 3/8" of fabric at the turning opening, so that when you topstitch, there's enough fabric there to secure the opening closed.

Okay, in the above picture, I just want you to see how all of the clipping and cutting should look. The turning opening has a 1/2" to 3/8" wide tab of fabric for when you turn and topstitch. The whole perimeter of the pad (except the turning tab) has been cut back to 1/8" away from the stitching. All of the inside corners have been snipped, right down into the corner and right up to the stitching. All of the outside corners have been clipped off.

Now you'll turn your pad right side out. I find it easiest to start at the end of the pad that's farthest from the turning hole, tuck that in towards the hole, and push it through, then the same with the wings. The rest usually follows pretty easily. Unless you made your hole too small. Like I did.

Once the pad is right-side-out, you'll notice that it's not very crisp looking. Use a pointy tool, with a dull tip (I use a big, blunt ended knitting needle) to push and poke out the corners and seams. I run the knitting needle all the way around the inside of the pad, right up against the seam, to really make sure all of the fabric is where it should be, before I iron or topstitch. Tuck in the turning tab, and pin it in place if needed.

At this point, I like to iron the pad. This isn't a have-to-do kind of thing, but if you want to take your work up a notch, it's a good idea. My goal when ironing is to make sure that the topper fabric and backer fabric meet up nicely at the seam, without overlapping. I don't want the backer showing at the top of the pad or the topper showing at the back, if I can help it.
*Because the suedecloth was so squirrely, I couldn't for the life of me get the topper and backer to line up the way I wanted, but I decided to be satisfied with it, since it's not for sale or anything.

When you're ready to topstitch, you'll place your pad under the presser foot, positioned so that there's about 1/8" between your needle and the edge of the pad. (1/8" seam allowance.) Look at your presser foot and see where the edge of the pad is touching the foot. As you work around the pad, make sure that you are guiding it so that the edge of the pad is always touching that spot on your foot. Don't pay attention to the needle, just keep the edge of the pad aligned with that spot. This will ensure a nice, even topstitch. I like to start stitching right before the turning opening, and stitch that closed the very first thing. As you work, use your fingers to pinch and roll the seam as needed, to make sure that the topper and backer fabrics like up properly. Remember to backstitch a few stitches when you start and stop. When you get to the end, remove the pad from your machine and clip off any remaining threads.

And now that your sewing is finished, all that's left is adding the snaps! I like to fold the wings behind the pad and make sure they'll be nice and snug, and then poke the hole for the snaps through both wings at the same time. That helps me make sure they'll line up right where I want them.

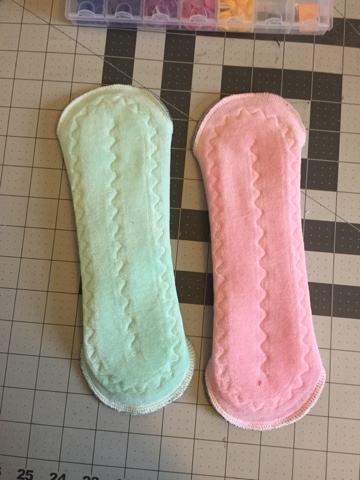
And your pad is finsihed!
When I first tried these things, I was a little daunted. I was focusing so much on everything, that it didn't seem like it would save any time. But after making just a few pads this way, I am completely amazed at how much faster it is. I can make twice as many pads in the same amount of time, because I'm not carefully cutting out all of the individual pieces, clipping jillions of notches, or navigating tricky seam allowances. And it has really saved my hands, because I'm not using scissors so darn much any more. Hopefully this will be a big help for you too!