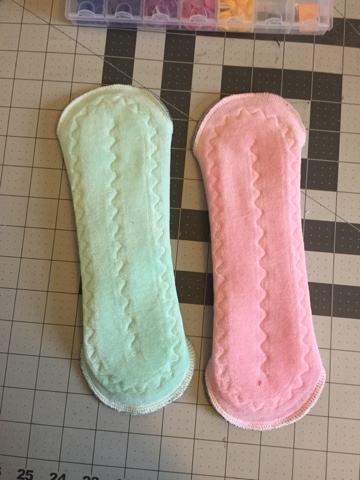
Monday, October 3, 2016

Pad Making: Speed Cores

One of the biggest pains of pad-making, is all of the cutting you do. Piece after piece after piece. But as I've reviewed and tried different patterns and techniques, and tried some new things, I've stumbled onto a way to eliminate most of the cutting. That's a lifesaver on the hands! Today I'll show you the speed method for cutting and sewing cores.


You'll want to start by using a water soluble marker to trace your core pattern onto just one layer of your core material- the layer that you'll have on top or bottom of your core sandwich. I'm using a crayola washable marker, and my top layer here is just some white, double napped diaper flannel. I'm tracing my pattern piece near the edge of the fabric, right on the roll of flannel.


Next, using a rotary cutter, roughly cut out around the piece you just traced, in a rectangle shape.


Now, place that rectangle on your next layer or two of core fabric. Again with your rotary cutter, cut out your next layers of core material (as many as you'll need), in pretty much the same shape as the first piece you cut. 


There's no need to be precise for the cutting part. Just make sure each layer of core is big enough to accommodate the shape you've traced on that top piece. And sandwich the pieces all together, making sure the traced part fits inside each piece in the stack. (My sandwich is that layer of diaper flannel and a layer of Zorb 2 with dimples, which is nice and floppy. You can do as many layers as you want, of whatever you'd like, but I wanted a thinner, moderate absorbency pad core.)


Pin or clip your stack, just to make sure things don't shift around on you as you sew. 

 
Since I'm working with a combination of woven and knit fabrics, and cores can be thick, I'm using a walking foot. I highly recommend using a walking foot for any part of the pad assembly process. It will make a huge difference in ease of sewing, and the quality of your finished product.


Next, set your machine to a zigzag stitch. The stitch can be as tight or open as you'd like. This part will be hidden in the pad, and we are just trying to secure it and keep it clean. Place your sandwich under the presser foot, with the traced line on the fabric facing up. Make sure that your stitching will fall just inside the line that you traced on the fabric.  Find a spot on your presser foot, and just make sure that the line travels along at that spot consistently.  


And now stitch around the core, keeping your stitching just inside that traced line. Make sure you lift and lower your presser foot as much as you need when you're coming around the curves, instead of pushing and pulling your fabric around. That will keep your sandwich from bunching and puckering. And if you tug and push the fabric, it will fight with your walking foot and warp the fabric. 

*Just remember too, that when using a walking foot, you don't want to back stitch. A walking foot isn't made for that, and can cause mechanical problems in your machine if you do it.


Once you've stitched the core, it's time to cut it out. Since you're cutting through several layers, use a pair of good, sharp scissors. Cut just outside your stitches, along the traced line. Don't cut your stitches!


Cut all the way around your core until it's free of its rectangular prison.


And you're done! One nice, flat, even core that you only had to cut once. 

This has been a huge time and energy saver for me, and especially when working with stretchier core materials like Zorb 2, which tend to stretch and warp, it really helps produce a nice flat core that's easy to center with every layer exactly the same shape, and this core won't interfere with your pad stitching and distort the shape of your finished pad.

Pattern Review: Nessie Pads Pattern

As I get closer to my due date (just a few weeks now), I've felt a push to finish building up my pad stash as quickly as possible.  This seems like the perfect time to delve into the world of serged pads.  It seemed a lot faster to serge a pad than to bother with all of the clipping and turning and top stitching.  I wanted to test this theory.  I've seen tons of great reviews of the pads from Homestead Emporium, but due to US legal red tape, they don't ship their pads from Canada to my area.  One day I hope to be able to figure out how to recreate something similar, but in the mean time, I needed to learn how to make any kind of serged pad.  I gave it a go with my Mamma Can Do It pattern, and they turned out fine, but lopsided.  And left me feeling like I have no control over my serger.  ... Probably because I don't.  So I searched on Etsy and found this pattern and decided to give it a try.

The Pattern:  Nessie Pads Cloth Pad
 
  
 This instant download pattern comes with 11 pages of clear, color photos, assembly instructions, suggestions, and pattern pieces.  It includes patterns for a liner size, a light/moderate size,  and a moderate/heavy size.  The description and pattern don't state anywhere what the lengths of these pads are.  So since I'll be using this for postpartum, I just chose the biggest one to print out and hoped for the best.  (I didn't want to print and measure them all.)  The larger, moderate/heavy pad works up to be about 10.5" long, but I haven't bothered to print and measure the other sizes yet.

 The instructions are pretty clear and straight-forward.  I thought it was interesting that the designer basically repeated the same set of assembly instructions and photos 3 times, once for each size of pad included in the pattern bundle, when it seemed like it could have been stated just once.   It wasn't a problem at all, and there were slight variations, but it just seemed repetitive.

She also includes good suggestions and guidance for fabric selection. 

This pattern was designed to create an "exposed core" style pad, with the exposed core being serged as well.  All of the instructions in the pattern are for that style of pad.  It does have several other suggestions for changing up the style, but none of those suggestions come with any instruction.  You're just left to figure out the assembly for those on your own.  

I personally didn't like the idea of a serged, exposed core for my personal use.  I typically use Zorb in my cores, and I don't like the idea of any bits of fluff escaping out of my core materials when I'm using the pad.  I also didn't feel like a serged exposed core would give my pad the "finished" look that I like.  I think that a turned and topstitched exposed core would be nice on this pad, but the pattern just isn't designed for that.  So I decided to go with an internal core.  It took some work to figure out how to center the core on the back of the topper, and then I just needed to think it through for the total assembly.  Not a big deal, but a little inconvenient the first time.

When all was said and done, I actually really liked the way this pattern.  It was honestly the only serged pattern I could find on Etsy, but it worked out well because it turned out to be a good one to learn on.  Even with the bits that weren't ideal, it was really easy to make, and took just 20 minutes from the time I printed the pattern, to completion of the pad.  It's a great width, approximately 2.75" to 3" wide, depending on the materials you use.  Once snapped, the finished pad is straight, with no flare.  I did wish a bit for a longer length in the moderate/heavy pad, because a pad this length doesn't seem quite long enough for overnight use.
 
 I ended up making 3 pads in about an hour and a half, and that included stopping to take photos for some more blog posts.  They didn't turn out perfectly, but the pattern was good enough that I was able to make them with confidence and feel good about how they turned out.

I do wish for more serged patterns now!  Having tried this pattern,  I'd like to find some with more lengths, and I prefer a pad with some flare at the ends, so I'd like to find patterns with more shape and length variety.  But this was a good starting place, a good first serged pad, and it will be functional, even beyond postpartum.

Friday, September 30, 2016

Pattern Review: My Green Cloth "Curves"

*I'm playing a bit of catch-up with posts like this one, that I'd started months ago, but then got too sick to finish.  Hopefully I can get caught up before the baby comes in a few weeks.

This pattern turned out a pad that ended up being a gift.  I'm actually a little disappointed that I gave it away, because I'd really like to try it out in real life, not just the sewing!

The Shop: MyGreenCloth
The Pattern: Curves


In a previous post, I reviewed another pattern by this designer, Courtney, and described the interaction with her, which was great.  There had been a mix-up with a pdf, and she very generously accommodated me.  I decided to buy all of the patterns she has in her shop (there are three).  So this was the next one that I tried.  


Once again, the pattern was easy to print and assemble.  And once again, the instructions for including a hidden PUL layer were a bit muddled to me.  There is a set of instructions there for it, but they are short, with very few pictures, and those pictures don't explain just how to do it very well.  


For some reason, I found the angles of the curves on this pad a little difficult to navigate.  You can see how they are more of a rounded corner than a nice, easy-to-sew curve.  But I found that if I just slowed down a little, it wasn't a problem.  It turned out to make a great shape, although not a fast pad to work up.  So again, maybe not the best pattern to use for your very first pad, but it would be great once you get the hang of pad-making and are ready to try something new.

One thing I do really love about the MyGreenCloth patterns is Courtney's method for assembling and stitching the core.  It's a method that saves a lot of time, because you don't have to cut out each individual layer, one at a time.  It also helps prevent the layers from slipping around and distorting the shape, which is a problem I've had before.  So this is now my preferred core assembly method.
This pad works up to be about 3" across and (if I remember right - curse me for giving it away before measuring!) about 10.5" long.  That's a little wider than what I would wear as a day-to-day pad, but will be great for me as an overnight or during the daytime for postpartum.

Pattern Review: My Childhood Treasures Peasant Top

When I got my new sewing machine a few months ago, I decided to try it out on a new pattern. The machine had me in tears, but the project sure turned out cute!

The Pattern: Natalie Peasant Top

I have a little girl who has been a bit jealous of all the things I've been making for other people.  So when I saw the pattern for this sweet little peasant top, I knew it was the one to fill the need. 


This pattern is just 2 pieces, the main body and the sleeves.  It has options for long or short sleeves, and the short sleeves can be a puffed sleeve like I chose to make, or a flutter sleeve.  The instructions come with loads of details and pictures.  It's also sold in baby sizes, but this one comes with sizes 2-10.  

When I was a teenager and young adult, garment patterns were only available from the fabric store, printed in all the sizes on the same piece or pieces of tissue paper.  The sizes were never true, and it was a monster to try and cut out the size you wanted, while still preserving the pattern so that you could use it again in other sizes.  The instructions could be hard to follow, and used technical terminology and markings that made it tough to assemble the garments unless you'd had sewing classes.  And even then, it could be daunting.  (Obviously, those patterns are still what's sold at the fabric store.)  My mom told me that she once heard an interview with a representative from one of "the big three" pattern manufacturers.  He said, "we sell dreams," meaning that the patterns weren't exactly designed for real-life use, but for drooling over.  Like a really expensive Pinterest board.

Indie sewing has changed all that, to my great relief.  The movement of independent designers has made it possible to buy patterns that are generally true to size, with easy-to-follow instructions, and patterns are instantly downloadable to your computer, so you're able to print and cut them as many times as you need.  They're actually made for average humans to use.

This pattern worked out in just that way.  It was so simple, that it kept me from returning my sewing machine!  (Fortunately, I have since developed a better relationship with my machine, so it's a good thing I started out with an easy project like this!)


There were lots of clear instructions, accompanied by excellent photos.  The instructions were broken up in a sort of step-by-step grid, which made it easy for my tired brain to stay on task and work in the correct order.  The little blouse worked up very quickly, even with my confusion over my machine.


Even now, this is my daughter's favorite shirt, and I find myself washing it constantly.  It was true to size, and I love that the design makes it adjustable (I could make it longer if I choose), with lots of sleeve options.  I also loved the elastic neck and arm bands, which have helped it keep its fit, even as she's gone through a growth spurt.

Thursday, September 29, 2016

Healing Salve Recipe

In my last post, I talked about my plans to use some herbs to help my recovery along after the baby comes. (Since that time is coming up fast, most of my posts will be related to my frenzied preparations.)

I decided to share the "recipe" I use for making our family's salve here. Its been a huge blessing for our accident-and-injury-prone family. As I mentioned in my other post, the herb mixture isn't exclusive to using in salves or ointments. It can also be used in lots of other applications. (Since I'll be using the herbs in more tender areas this time, I'll be omitting the cayenne pepper for this round.)

We use this salve for bruising, scrapes and cuts, sprains, and other minor injuries. I've given tubs of it to friends who have had surgeries, dislocations, and other injuries, and they've said that it helped. Many of the herbs in this recipe also have pain relieving properties.  Just FYI,  this ointment smells funny.  Like... herbs.  It's not an offensive smell though, and I don't really mind it.

*But please note that I am not an herbalist! So please do your own research when it comes to using herbs. Some can be dangerous when ingested or when used in large quantities or for babies or small children. Don't be poisoning yourselves!

Healing, pain relief salve:
1/2 cup coconut oil
1/4 cup shea nut oil
1/4 cup sweet almond oil

2 Tbsp Dr. Christopher's BF&C herbs
1Tbsp valerian root powder
1 Tbsp St. John's wort powder
1 Tbsp comfrey root
1 Tbsp lobelia leaf
1 tsp cayenne

4 Tbsp (1 oz) beeswax (pastilles or grated works best)
Approx 20 drops desired essential oils (you can use any. For aroma or healing properties or both.)


Pour carrier oils and herbs in a sauce pan. (Everything but the beeswax and essential oils.) Heat the mixture, stirring it a little, until it's hot but not simmering, so you don't scorch the herbs. Cover and remove from the heat. Let it steep for 30 minutes or more. Heat it again, stirring a little, and remove from heat before it simmers. Cover it again, and let it steep at least 30 more minutes, but preferably overnight. The longer it steeps, the more active the herbs are in the finished product. I steep mine overnight.

Strain the herbs out of the oil using a clean cheesecloth or muslin. Make sure you twist and squeeze the herbs in the cheesecloth to get all the oil that you can out. A lot gets trapped in there. Oil will get all over your hands, but I just rub it in like lotion. :) Discard the herbs.

Put the strained oil in a double boiler to reheat it. (I like to just use a glass measuring cup in a pan of hot water, because in the end, that makes it easier to pour into containers without spilling and wasting.) Add the beeswax, and heat and stir until it melts. Remove from the heat and add essential oils while it's still hot. 


Quickly pour into clean containers, because it will start to set up fast as it cools. If it solidifies too fast, just reheat and then pour again.


I like to use different sized containers. I keep smaller tubs in my purse, in the diaper bag, in the car, etc. I store larger tubs in the fridge so they don't go rancid before we can use them.  I also plan to make a batch with more beeswax to make it more solid and less lotion-y, and pour the hot mixture into roll-out Lip balm tubes so that it can be applied directly to the skin like chap stick, instead of needing to dip into tubs or jars.

All of these ingredients can be found at herb or health food stores, but you might need to hunt for the Dr. Christopher brand herbs, as they're more of a specialty item. Containers for storage and use can be found easily and inexpensively online. 

Beeswax is sold in many forms, and pastilles are definitely easiest to work with here, because it can take some serious muscle power to try and grate a block of wax. Olive oil can be substituted for the other oils in this recipe, but I like using these because they're more moisturizing and seem to soak into my skin, instead of just sitting on top of it like olive oil tends to do for me.

Using Herbs Postpartum

Around my house, we use a healing herbal salve that I make. We use it for speeding the healing of bruises, minor cuts and scrapes, sprains, and other minor injuries. With large household, we go through a lot of it, and we also give it as gifts. 

Today I mixed up a double batch of the herbs. I'm saving half to use the next time we start running out of the ointment. 

The other half is what I'm focused on today, since I'm in a hurry to finish preparing for this little baby to join our family. I'm putting the second half of the herbs in a tea bag, to steep and then use as a compress for myself after the baby comes. The tea bag could also be used in the bath after a birth, sort of like bathing in a tea, to help speed healing. But since I prefer showers during that healing time, I'll be putting my "tea" into a small bottle, which I can use to apply it to my postpartum pads. (I'll just spritz some onto the fresh pads.)


I'll be using that with the witch hazel pads I get at the hospital. I might just make my own, reusable pads, and add some witch hazel to the mix. I'll have to see. If I do that, I'll just make small, single layer flannel washcloths that can be moistened with the tea and witch hazel, then set those on my pads when I change them. I have a large shipment of flannel arriving this weekend, and might dedicate some for this.

For now, my tea bag of herbs is steeping in a half gallon mason jar on the stove, over an ultra low heat double boiler situation.

The tea bag is simply a muslin drawstring bag, which prevents the need to strain out the herbs later on. After steeping this batch, I'll freeze the tea bags to use again later. The next time I use them, the tea will be weaker, but that's okay.

This is my first time using herbs in this particular way, but I'm hopeful that it will help to speed up my generally long healing process after the birth of this baby. Since there are still some weeks before baby comes, I'll probably freeze the finished tea in small containers until I'm ready to use it. And then any leftovers can be used for compresses, in partnership with salve.

I'll share the recipe and process for making the salve in my next post. Just know that the same mixture of herbs can be used in a variety of ways. You don't have to just mix them with oils or waxes.


Saturday, September 24, 2016

DIY Flannel Wipes (With Videos)

I'm not a "crunchy mom," or an "environmentalist."  But when I find that a reusable product that works better for me than the disposable version, you betcha I'll use it!  For example, flannel washcloths or baby wipes.  

My babies are born with really sensitive skin.  For their first several months of life, it doesn't matter how quickly I change their diapers after they poop, they will end up with a bleeding rash.  We've found that disposable wipes make the problem worse.  With my first several babies, we used regular terry washcloths with plain water on their little bums.  Terry washcloths are rough and irritating, but it beat disposable wipes.  


With my last baby, his skin was so sensitive that even the chemicals in disposable diapers would cause blisters, so we switched to cloth for a time.  And that is what lead me to the discovery of flannel wipes.  I saw them recommended everywhere with cloth diapers, and for good reason!  So I learned to make them.  

Flannel wipes have been a game-changer for diaper changes in this house, and I feel pretty silly that I didn't know about them 6 babies previously.  They're grippy enough to get baby clean, but soft enough to not cause further irritation to baby's already sore bottom.  They're also great for loads of other uses.  They're good for cleaning little hands and faces.  They're great for makeup removal.  Lots of reusable-product-types use them as a toilet paper alternative, or larger versions of the same thing as un-paper towels.  For women who like reusable menstrual products, they can be used as a trifold liner in a "pocket and liner" or "base and liner" pad. Really, these little guys can be used for all kinds of things.  And they're also super cheap to make.  (Flannel can be purchased for $2.75 a yard around here.)

I was recently asked by a new mom for more information about them, and after hearing more, she wanted to give them a try.  So I decided to make a video explaining how to make them.  They are so dang easy!!  Of course, I am as awesome at videos as I am at photography, so I couldn't figure out how to upload it all in one video, and had to split it up.  But for anyone interested, here are the videos. I like to make lots of them in an 8" square size to have on hand with new babies, and they make great gifts for other new moms.


Now, I am no fan of laundry.  So I have a system for laundering the reusable wipes that keeps the work to a minimum for me.  I like to keep the clean wipes in a mesh laundry bag by my changing area or sink, so that I can just grab one or two out of the bag and wet it down just with plain water for cleaning the baby.  Once used, I put the dirty wipes into a second mesh bag.  When I'm running low on wipes, I zip up the bag of dirties and toss it in the wash with my regular laundry.  I wash and dry them in the zipped bag in a whatever load I'm washing at the time.  Then, when the load is dry, I can just grab the bag of clean and dry wipes, already collected in one place, and I don't have to do any additional sorting or folding. The bag of wipes fresh from the dryer becomes my new "clean" bag, and the other bag that I'd been taking clean wipes from now becomes the new "dirty" bag.   I don't bother with pretty folding and stacking.  I have more important things to do. 


Mesh laundry bags like those pictured here can be found for cheap on Amazon.com or at stores like WalMart, Target, etc. in the laundry section.  They're also frequently called "lingerie bags."  If I'm giving a new mom any of the wipes as a gift, I like to include at least one mesh bag with the gift, so it's a double bonus that the wipes and mesh bags are so inexpensive.